Everything Jelly Rolls
Click on the image or HERE for the video about this!
Jelly Roll: What Is It?
Moda started it all. Really. It’s Moda’s fault. :)
In 2006 or so (there was a lot of contradictions on this on the interwebs), Moda Fabrics came up with the concept. The idea is that it’s a commonly used size of cut of fabric.
So, what is it exactly? A jelly roll, which got its name from the pretty shape, is a set of 2.5” fabric strips. Each set usually contains (40-42) 2.5” x WOF (width of fabric) strips, but some contain less. Because the width of fabric (selvage to selvage) can vary between prints, each strip can be shorter or longer depending upon the print. Generally, each strip is between 42” and 44” long.
Other Names
Other companies started following suite and made their own versions of Jelly Rolls. Because the name has become synonymous with the product, they tend to all be called Jelly Rolls, and for the sake of clarity in this post, I am going to refer to them all as Jelly Rolls (think Band-Aid vs. bandage). Either way, it is important to know the other brands, right? I’ve got you!
Note: Not all strip sets like this contain (42) 2.5" strips. Some contain less. Make sure to read the description before buying so you know what you are getting.
Tips for Using Jelly Rolls:
Tip 1: Matching Project With Set
In a perfect world, we would have a pattern in mind and buy the set of 2.5” strips accordingly, right? Although it doesn’t always happen to me (just look at my storage in my sewing room), it is a good idea to have a project in mind when buying a jelly roll. <insert collective laughter here>. Anywho, if you have a project in mind, this will help inform what kind of jelly roll you need. For example, if you are making a project that needs a lot of different tones, shades, and color value, a collection set is a great way to go. It usually is a piece or two from a collection of fabric. Because it is a designer’s collection, it will automatically contain a range of color values.
However, if you are making a project where you want to have the same value, a collection of colors would be a great option.
Or, if you are just interested in collecting stuff you like, do that. That’s what I tend to do. I will find the project later! 😀
Tip 2: Know What You Are Buying
Check out the fabric before buying. This doesn’t mean opening the roll. Don’t do that! That will be a sure way to make enemies with your local quilt shop owner. There are other ways to go about this. The best tip I can give you is to always read the descriptions. Some have less strips, some have more, some have repeats, some don’t. Know what you are buying.
Lights, Darks, and Mediums
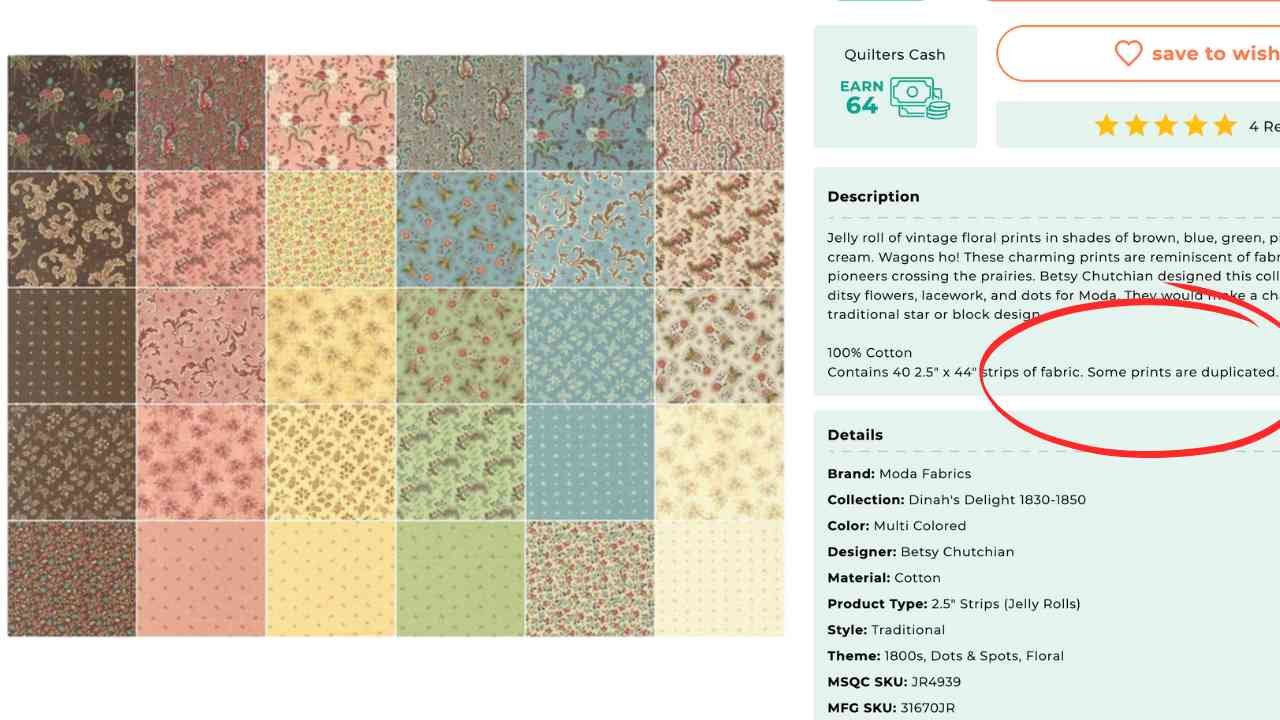
My favorite way is to go online and search for the set. Simply type in the set you are thinking about purchasing. Usually you can see a view of all the fabrics. If you know you want a lot of contrast, you can take a screenshot, change it to black and white, and see the contrast in the set.
Look for Repeats
Make sure to notice how many repeats are in the set. If the description doesn’t tell you, you can always count the number of prints. That will give you an idea. For example, Mercantile Rolie Polie by Lori Holt contains 42 strips and in the photo, it shows 42 fabrics, meaning there is one of each strip.
Tip 3: The Strips
Let’s talk about the strips. Like I mentioned, these sets are made up of 2.5” strips by the WOF (width of fabric). But there are a few things to consider, or remember, about these wonderful bundles of 2.5” strip joy.
Those Pinked Edges
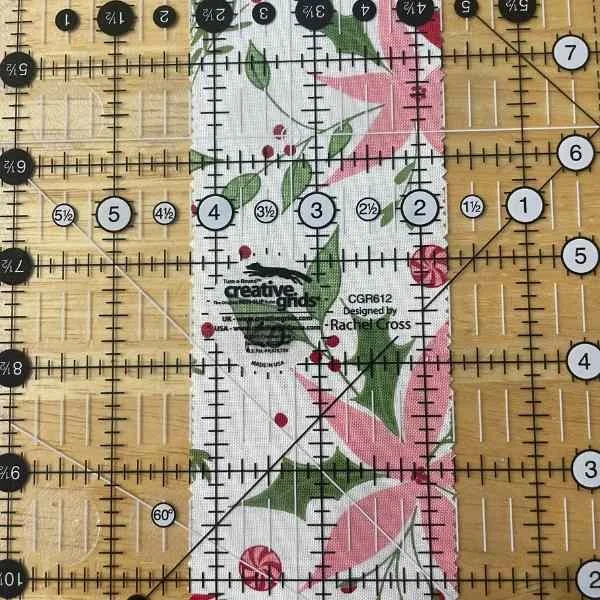
Unless they are batiks, they usually have pinked edges, which always begs the question: Do you sew to the point of the peak or to the valley of the peak? This really depends on the manufacturer and sometimes when they are manufactured. My solution? I measure each time I open a jelly roll. This is the best way to know for sure.
Fabric Grain
Next, let’s talk about the grain of the fabric. Because these strips are cut selvage to selvage, they are cut on the cross grain. What does that mean? It means it is stretchy. This is great for binding, but can cause issues if you aren’t aware and tend to stretch fabric as you sew. Be careful with this. Stretching too much can cause it to bow. Just something to be aware of.
Tip 4: Opening the Pack
Recently, I have noticed more and more manufacturers are sealing these rolls with plastic. I love this! This helps with the dust that accumulates when they are sitting pretty on a shelf and I am sure helps with the fraying that occurs in the quilt shops, too. However, since they are sealed in plastic, I have noticed they have a little more lint than they did before. Makes sense—the open-air jelly roll sets had time to shed a lot of lint before coming home with us. To help combat this, I immediately hit the roll with a lint roller. Mama ain’t messing around! This gets off a lot of the fuzzies (not all—they are still messy). I am also aware that fuzzies will be everywhere. This is not the time to wear black. You’re welcome. :)
Tip 5: Sorting Strips and Stuff
When you open a set and after giving them a good go-over with a lint roller, it is time to sort, iron, prepare them, store them flat, whatever it is you intend to use them for. Usually sets are arranged in a way that is pleasing to the eye while rolled, and often that is from light to dark or dark to light. Sorting can help see what you have.
Unroll the Jelly Roll
Once you start unrolling the jelly roll, you will notice two things: the strips are folded in half, selvage to selvage, and the fabrics are staggered. This is easily fixed, however, but separating them and stacking them. Personally, I like to sort them into colors, but you may like to do it a different way. Also, the pattern you are using can have a lot to do with how. you want to stack the strips.
Pressing Strips & Trimming Selvages
Some people like to press their strips and trim the selvages at this point. That is completely up to you. Just know both of these tasks will need to be done at some point, whether now or later.
Another concern is prewashing and starching. Should you do either? Again, that is a personal choice. I do not prewash them because of the fraying, but you certainly could. As for starching, sometimes I do and sometimes I don’t. That is completely up to you, just know starching will change their size because starch tightens all of those fibers.
Delete or Add More Fabric
Don’t be afraid to take fabric out or add fabric to enhance your 2.5” sets!
Storage Solutions
How do you store these? What do you do with the leftover strips? These are great questions! For me, I love storing them as they are. They are pretty. They look nice on a shelf. Did I mention they are pretty? This is probably one of my flaws: I love the look of precuts, so much so that I don’t want to use them. 😀 BUT, I really should work on this, because I love using them, too!
Now, what do you do with the leftover strips or even strips that you cut from your scraps? I have been keeping mine jumbled up in a bin. It is a terrible storage solution, so I don’t suggest doing it! I have also kept them stacked in the color binds. Again, terrible idea because as soon as I start to dig, they become a jumbled mess! Sooooooo, I, too, have been looking for a solution. I am currently trying these mini ArtBin Essentials, which have been working fine, but I wanted an even better solution. This brought me to The Simple Quilters video that can be found HERE. She uses these wonderful storage containers to storage her strips! Ingenious! I also found some ideas on Pinterest. Stay tuned! I will have more to share on this at some point, I hope!
If you have any tips on this, I would love to hear them! I need help, obviously! 😀
Videos I have made using Jelly Rolls:
Quilting on a Budget: Scrappy Christmas Quilt
Jelly Rolls Shown in Video:
Rolie Polie: Handpicked Produce: Fanciful Florals: Orange Fix by Riley Blake Designs
Once Upon a Christmas by Sweetfire Road for Moda
Coming Up Roses by Create Joy Project for Moda
Iris Ivy by Jan Patik Quilts for Moda
Sunroom by Elizabeth Hartman by Robert Kaufman
Favorites: Vintage Linens by 3 Sisters for Moda
Fancy Fruit by Kris Lammers for Maywood Studio
Weather Permitting by Janet Clare for Moda


