Just One Layer Cake Hourglass Quilt

To watch the full tutorial, click on the image above or click HERE.
Quilt Inspiration
Like in my last Just One Layer Cake video, this quilt all started with me playing with a layer cake. Mind you, my first attempt isn’t always the one I go with. In fact, this quilt took a few attempts to find something that I liked. It is also important to note that I don’t always love the layer cake I am using after I open it up. Both of these came into play with this one. I carried on, however, bound and determined to make a One Layer Cake quilt! I can do it!
Let’s Make It!
Who doesn’t love an hour glass quilt block? It is a classic pattern, it’s easy, and it’s fun. When finished, this quilt will measure 48” x 56"—a perfect lap-size quilt.
Supplies You Will Need
(1) Layer Cake or (42) 10" Squares
Rotary Cutter
Ruler: 9” square or larger with a 45 degree angle running through it
Long Ruler for marking lines, at least 15” long
Marking Pencil
General Sewing Supplies: Sewing Machine, Iron, Matching Thread, etc.
For Finishing:
Backing: 3 Yards seamed horizontally in the middle
Batting: Twin or 1.5 yards of 90 wide (You will have extra)
Binding: 223 inches (15 inches extra for mitered corners and joining)
If using 2.5” wide straight binding, you will need six strips from 1/2 yard of fabric
I used the fabric line Midnight in the Garden by Sweetfire Road for Moda in this video, but you can use whatever layer cake you’d like! If you want to use scraps, I have a great video (if I do say so myself) on how to make your own layer cakes. Click here to see it! I also have a blog on it. Check that out here.

Step 1: Pick The Hourglass Fabrics
The easiest way to do this is to just dig in. Open up the layer cake and choice two contrasting fabrics. Try not to overthink this. It is supposed to be fun! Just pick two opposites. Repeat until you have 21 sets (each set consisting of two contrasting 10” squares).

Step 2: Match Sets
Match up two contrasting fabrics to make 21 sets (42 divided by 2 = 21). You don’t have to worry about them being light and dark necessarily , just make sure they contrast.
One set at a time, match right sides of fabrics together to prepare to make the half square triangles units.

Step 3: Draw Center Line
Take one of the contrasting sets (two 10” squares) and place them right sides together. Line the set up on a cutting mat with the lightest side facing up. Rotate the set 45 degrees so the points of the squares are on a line on the mat. Any line will do, just make sure both the top and bottom points are lined up. Using a long ruler, place the one edge of the ruler on the line. Draw a line corner to corner.
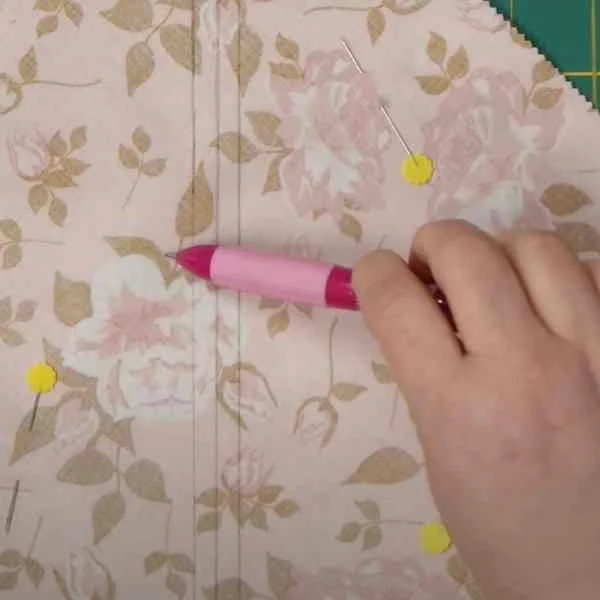
Step 4: Draw 1/4” Lines for Sewing
Next, move the ruler over 1/4” from the center line and draw at line. Do the same on the other side of the center line (see photo). Sew on the 1/4” lines (1/4” from the middle line on each side.
Pin the squares together to make sure they do not shift. Sew on both of the 1/4” lines.
Repeat with all 21 sets of squares.
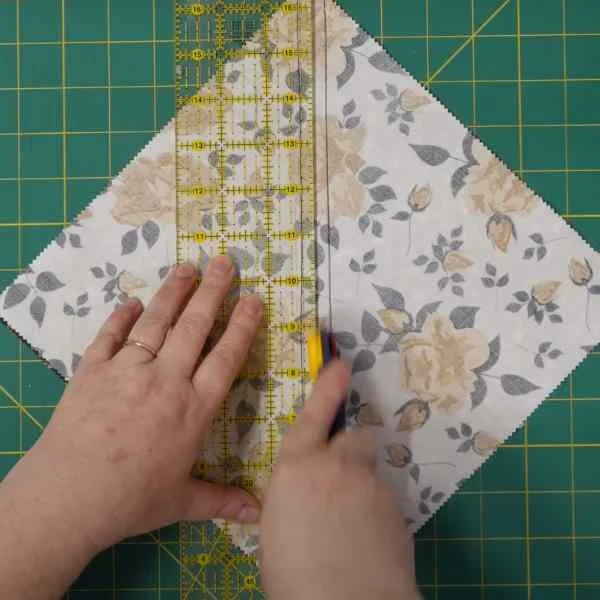
Step 5: Cut Squares Apart
After both lines on each set are sewn 1/4” from the middle line, set your seams (this will get rid of those bubbles). If your fabric shifted some during the sewing process, don’t worry. We will be squaring everything up like always. Next, use your ruler and rotary cutter to cut on that middle line on each set. Open the half-square triangle unit and press to the dark side. Keep the sets together. Repeat on all the units. You should have 42 half-square triangles (21 matching sets).

Step 6: Twist and Shout (Not Really Shout) :)
Let’s make some hourglass blocks! Now that you have your HSTs sewn, match them up, right sides together, so that the center seam nests and the light is against the dark fabric and the dark is against the light fabric.

Step 7; Draw Sewing Lines & Sew
Just like in Step 2, you are going to line the set up on a cutting mat. Rotate the set 45 degrees so the non-sewn points of the squares are on a line on the mat and the seams are perpendicular to the points (see photo). Using a long ruler, place the one edge of the ruler on the line. Draw a line corner to corner. Next, measure over 1/4” and draw a line. Draw a line 1/4” on the other side of the center line (see photo). Pin the HSTs together so they do not shift much during sewing.
Next, sew on both of the 1/4” lines just like before. Set your seams, cut on the line, and press the blocks to one side (it doesn’t matter which side).

Step 8; Yay! Hourglass Blocks!
We are almost finished making the blocks! Yay! Next, open up your hourglass blocks and press.
If the block is a bit wonky, that’s okay! We are going to trim them up in this set. Right now, the blocks should measure approximately 9.5,” but since they are probably a bit wonky, we are going to square them up to 8.5.” Now let’s do some math. 8.5” divided by 2 = 4.25”. This is the number we want to remember because that is our center mark.

Step 9; Squaring Up The Blocks
Place your square ruler on the block. Line up the 4.25” mark (8.5” divided by 2 = 4.25”) on the intersection of your block. Make sure to measure from the top and the right side. Also make sure the 45 degree line on the ruler is on the 45 degree line on the block. Trim the right side and the top of your block.
After trimming the right and top sides, lift your ruler and turn the block so that the upper right corner is in the bottom left position.

Step 9 Continued; Squaring Up The Blocks
Next, line up the bottom and the left side of the block on the 8.5” lines. Also make sure the 45 degree line on the ruler is on the 45 degree line on the block. Trim the right side and the top of your block.
You have successfully made your block! Yay! Repeat this process with all 20 remaining sets.

Step 10: Layout Your Quilt Top
To lay this out, arrange the hourglass blocks so they are opposites, one going up and down, the next going side to side, etc. Lay this out six hourglass blocks across and seven down. The finished quilt will measure 48” x 56", the perfect lap size quilt!
Sandwich your quilt with a backing and batting.

Step 11: Quilt As Desired
As you can see, I chose a simple straight-stitch quilting design on this one. I love how it accentuates the block design.
It’s finished! I also made a table runner. What do you think?


If you would like a bigger quilt, use two layer cakes to make 80 blocks (you will have four extra). Layout the quilt eight blocks across and ten blocks down to get a larger quilt that measures 64” x 80,” which is almost a twin-size quilt. Add another layer cake to make 120 blocks (you will have six extra blocks) and make a quilt ten blocks across and 12 rows down, making a quilt that measures 80” x 96.”
Please let me know if you have any questions! As always, I am happy to help!
Happy Quilting!
Kris